Who am I? (Week 1)
Introduction:
I am going to be creating a mind map based on who I am what I like and what I know about them. I am going to be looking at what specifically I know and what I don’t know about of the subjects that makes me who I am as well as touching upon why I think this. We were given only three things that we think best fit who we are and what we like the most, the reason why we’re doing this is to understand what makes us who we are and what we like so we can use this information to develop our ideas around.
I have created a mind map that Labels all of the things that I think make me as an individual by what I like and what I know about them.

There are four distinct things that I think best suit me the most and I like these above all of the other traits. The other reason why I chose these above all because these I think are the four aspects that I know the most about and that I find most interesting.
The four things that I chose were: Knowledge, Martial arts, Nature and creativity
These four I think most interest me as an individual, so what do I know about them? And how can this help me in my FMP:
Knowledge: I like to learn and explore new things using information that I already know to explore further, to find out new information about a certain subject. Knowledge is a wide subject so it is hard to say what I know and what I don’t know about the forever expanding world of knowledge. I do know a wide variety of information that ranges from physics to art styles but I do know that I do not know everything about both of those subjects and there is far more information to find out.
This is going to help me with my future projects by knowing about various subjects can help me when starting something that relates closely to what the project is based around, whether it being a historical location or a physics-based environment this will help me.
Martial arts: Martial arts has been in my family for years and I have been doing it for a few years myself and throughout that time I have learned and discovered a lot of new things. I know about the origins of many of the martial arts as well of proper movement of the human body. This type of information is going to help me – as it did in the previous project – with animating a humanoid figured fighter, on how each limb will move and the extents each individual limb can move without stress.
There is a great deal that I do not know as well, more experienced movements and parts of the histories of some of the martial arts I still do not know of, as well as this, proper terminology of some moves and techniques.
Nature: Nature has been around me all my life, by having elders who own a farm and a mother who loves to garden I have always had the nature of this world free at hand growing up, exploring the world around me. I know a fair bit about how nature works and the things that live within it, whether it being a tree or a mouse I will know something about it. There are however still lots that I do not know about and that I could find out about more.
This can help me if I want to focus on making a forest something that is nature orientated this is going to help me.
Creativity: When is comes to creativity I do know a bit about different types of mediums both technological and paper based. There is a lot that I still have to discover about creativity and how to use the different types of mediums in different ways. This will help me when creating concept art for the designs of either 3D models that I want to create or just creating a conceptual art piece.
Evaluation:
Doing this task has helped me realise more about the main things that I think make me who I am, it’s given me a broader incite of what I actually know about the four main areas that I have chosen and on what I actually do know about them. Knowing more about this is going to help me when choosing and developing an idea for my FMP by giving my an understanding of what best suits me I can develop my ideas around this.
Who am I? – interviews
Introduction:
For this session we were given the task to create and perform an interview with someone within another Media based class and find out why they have chosen this course that they’re in and the type of direction that they are going for within their course. As well as this we will be taking down notes to create a wider understanding on what he other person wants to do in this course and after the course as well. The reason why we are conducting these interviews is to help us with our future research for our FMP and just for general research for other tasks. As well it is giving us more knowledge and preparation for other interviews.
Preparation
Before I could conduct my interview I had to think of questions to ask my interviewee, about what I specifically wanted to find out about them. In this case I was trying to find out what specialist study he was going to be looking into, what his FMP would be based around and what brought him to this point in time, his interests and wanting to do what hes doing.
So the questions that I asked were strictly professional because I wanted the interviewee to be as comfortable as possible and not making them feel awkward or uneasy by what I ask them. The was that I did this is that I structured my question so that they wasn’t too pushing to the answer that I wanted and that they wasn’t biased (one sided) questions so that would lead it to them answering the way that I want them to answer.
Interviews
The interview that I am going to be talking about is the interview that was conducted by Dan from the media department, I have never met or spoken to so they knew nothing about me, nor I did about them.
I started the interview by introducing myself and making sure that it was alight whether I could record the interview. After we was equated I asked my interviewee some questions that were based off of the overall topic that I wanted to find out about him. I asked him about what interest I’m and why he is interested about these subjects and he told me that he was interested in sound, more broadly he likes to create sounds for different types of genera’s. As well as showing an interest in sound he also mentioned an interest in many different cultures which includes: Indian culture, African culture, Spanish culture and Chinese culture.
The reason why he likes these cultures and how they interlink why he likes sound as well is because he like the individual and unique music that each of the different cultures have and they all convey a different meaning and individuality.
Throughout this Interview I found out that most of my life I have been mostly focused around doing more of the creative side of things weather it being on paper or expressively out loud it has bee mostly related around the creative side of things. I didn’t learn anything new about myself while I was in the interview as well as the questions that were asked I didn’t find out anything new about my personality or how it has developed throughout the years it come to his point.
As the question were asked I found out that I did in fact have a relation between what I am doing now and what I was doing in the past. There wasn’t much of a change within the goals that I wanted to do It has always been something creative. However, it has changed from being something that was more of animation that has evolved into more 3D and creation type work throughout the years but my motivation has always stayed the same as it is now.
(Add audio and video here)
For the interview that I was giving him I asked him question that weren’t too personal to him or to his lifestyle. The sort of questions that I asked him were question that were based around what his interests were and what brought him to this point of interest in both his life chooses and this field.
Also with my questions that I asked him I made sure that they weren’t one sided and pushed towards him answering the way that I wanted him the answer the questions that I asked.The reason why I asked him these questions the way that I did is because I didn’t want to make the interview forced or too one sided making my interviewee feel uncomfortable with both what I was asking him and what I wanted him to say.
(Insert his audio here)
Evaluation
Throughout this interview and the task I found out pretty much the same information that I already knew as well as the change within my type of profession that use to be something that was more animation (clay-mation, stop frame, etc) to something that if more of a 3D based goal. Asking the questions to the interviewee was a difficult task to do because everyone reacts differently to every question and I didn’t want to ask a question that picked up on something that emotionally effects them.
As well as this it was a little hard for me to ask as well as answer the questions that were given to me because not being very confident it game me some nerves when undertaking the interview because of both what was ask and what I was asking about.
The information that I found out could help me with my personal development because of what I found out I could see what my strengths and weaknesses are as well as my goals and I can work on both of these to help with my development within my specialist study as well as my FMP.
Personality test (Week 1)
Introduction:
Within this session we was looking at what type of personality that we have and whether it reflects us the way we and the other around us think of us and the results that we got. We are going to take the test called the Myers brigs test that is going to calculate our personalities based off of a series of questions. After this was done we would do the test for one of our peers on how we see them personally and see if it is how they perceive themselves and they’d do the test for us to see how they see us.
The reason why I am doing this task is to further understand what my personality is and how this is going to reflect on the type of work that I create for my FMP.
We was given a set of 60 different questions where we could answer whether we agreed with what the question was asking or whether we disagreed with what was asked (ranging from agree/disagree to strongly agree/disagree) or if we was neutral. After all of these questions were answered we was given a personality type. I took the test three times and each time that I did the test another set of result would turn up each time and the reason for this is because every time I took the test I concentrated more or less on what I was answering depending. Also by spending more time thinking about a question produced yet another set of results that was different to that of the last time I took the test.
This is the link to the test that I took: https://www.16personalities.com/free-personality-test
The result that I was mostly in common with was the Advocate personality and this is what it said:
Personality type: “The Advocate” (INFJ-A)
Individual traits: Introverted – 58%, Intuitive – 69%, Feeling – 71%, Judging – 64%, Assertive – 56%.
Role: Diplomat
Strategy: Confident Individualism
For this test I was being as honest as I possibly could, answering them to what I see them to fit how I think the most and the reason why I had to be brutally honest is because it would have given me the best result to how I think I am rather than what I would like myself to be. The written results that I got, told me about my strengths, weaknesses, what my career could be and what my friends and relationship would be like.
For the strengths and the weaknesses I agreed on some but not all of them that I got mainly because I didn’t think that I personally relate to some of the strengths and the weaknesses.
Strengths
- Creative – I agree with this strength and that is because I do think at times that I can be rather creative when I really would like to create something either for a FMP or for a privet matter I do like to get a bit messy and creative.
- Insightful – I think that I am rather descriptive with what I am doing and explaining in-depth description.
- Inspiring and Convincing – I don’t think that I am Inspiring or convincing and this is because I don’t think that I am too confident and not very good at some of the things that I do which is why I disagree with this.
- Decisive – At times I do think that I can be rather decisive when it comes to certain circumstances, generally on a topic/project or subject that I like I think that II can make up the correct decision for what I think would be best for my current situation.
- Determined and Passionate – I can relate to this because I have been doing martial arts for over 4 years and I’ve given up my time to train and progress in it.
- Altruistic – I can relate to this one too because I do care for those who are around me.
Weaknesses
- Sensitive – I cannot agree with this weakness as I’m not the sensitive type.
- Extremely Private – I slightly agree with this because I do think that I have a personal life out of the sight of the people that I spend time with in college.
- Perfectionistic – I do think that I can be a perfectionist when it comes to my work trying to make it as perfect as I would like it to, to every define detail and I’m not happy until the piece of work or art are complete.
- Always Need to Have a Cause – I don’t this that this is me personally because I am rather flexible when it comes to my goals and my tasks that I or others set me. As well as this it says “if routine tasks feel like they are getting in the way, or worse yet, there is no goal at all, they will feel restless and disappointed.” This is not the case I am somewhat pleased because it means that I learn from what went wrong and why I didn’t like the outcome.
- Can Burn Out Easily – I don’t think that this is me, I tend to take my time and try not to over work myself leading me to “burn out”.
I found it quite interesting about the results that I got and the strengths and weaknesses that I got, I thought that some of them were really on point and they described me to a point and on the other hand others didn’t really go to what I personally think about myself. If I was to say it was about 40-45% accurate to how I perceive myself as an individual.
Second test
For the second test we got a peer of our class to take the test for us on how they perceive us and we did one for them. They got a different result to what I got for myself which means that they seem me differently to how I see myself.
The result that they got for me was:
Personality type: “The Advocate” (ISFP-A)
Individual traits: Introverted – 64%, Observant – 58%, Feeling – 89%, Prospecting – 53%, Turbulent – 72%.
Role: Explorers
Strategy: Confident Individualism
These are the strengths and the weaknesses that this personality relates to the most. I can relate a little more to the results that my peer got when they did the test to show how they perceive me as a person.
Strengths
- Charming – I think that I can be pretty likeable to others that are around me and people have told me that I can be rather approachable and easy to communicate with.
- Sensitive to Others – I believe that I can be very in touch others around me making sure that they’re happy and well.
- Imaginative – I can agree with being imaginative because I tend to think of wacky and eccentric ideas for concepts, ideas and projects, often thinking of other worldly things.
- Passionate – I can slightly agree with this because I can get passionate with a few tasks or goals that I set myself and I can get very into some of the tasks that I do.
- Curious – I am slightly curious with some things that I do.
- Artistic – I can agree that people would find me artistic because of how I draw and how much that I draw and do things that are related to art.
Weaknesses
- Fiercely Independent – I don’t really agree with this because I am independent in some circumstances but the majority of the time I like to work within groups because I think it is a more flaunt and enjoyable experience.
- Unpredictable – I don’t really think that I am unpredictable I like it when things are structured and well thought out and not doing anything courageous.\
- Easily Stressed – I don’t think that I am easily stressed at all in any situation.
- Overly Competitive – I don’t think that I’m overly competitive because personally when I’m doing something I don’t see myself as being better than the other player of person, I would rather have fun in the experience rather than winning.
- Fluctuating Self-Esteem – I can sort of agree with this weakness because lately at times my self-esteem has fluctuated from good to bad.
I was quite surprised with what my peer though about be based off of how I act around them as well as how they perceive me as an individual.
Evaluation
Throughout this task I didn’t find out too much about myself then I already knew about myself so there wasn’t anything entirely different with the information that I discovered throughout this test. However, I did find out that there was a few things that I didn’t think were me at all mainly to do with the traits and how I am as a person.
I don’t agree with this test purely because of the fact that I show equal amount of traits that are in numerous types of personalities and I never really side with one or the other of the results that I got so for me I don’t agree with this theory and test. It was quite an interesting incite on how my peers and other people think about who I am and how I act around them.
Throughout all of these tests they all gave me different results and I think this happened because they all used a different method of getting information and presenting that information as well as getting the information. Out of the three test that I did I think that the best test which I though was the most accurate was the Myer Briggs test and the reason why I think this is because the other tests didn’t give the as much information as the Myer Briggs test gave me.
The first thing that I did was the spider diagram describing what I love and what I know about it most of which was just relaying what I already knew about the things that I love and relating them to future ideas. The second was the Interview that I though was like the first task but instead of doing it about yourself you were asked questions that the interviewer as well at it getting into a more personal level going back to why more.
Whereas the Myer Briggs test looks at all aspects on what your personality is like telling you how you behave as well as you attitude to certain things. The test also touches upon your strengths and weaknesses that you may portray which is helpful because it can show you what you are good at and what shows as a weakness which will help in further development of both yourself and your projects to come.
Skateboard research (Week 2)
Introduction:
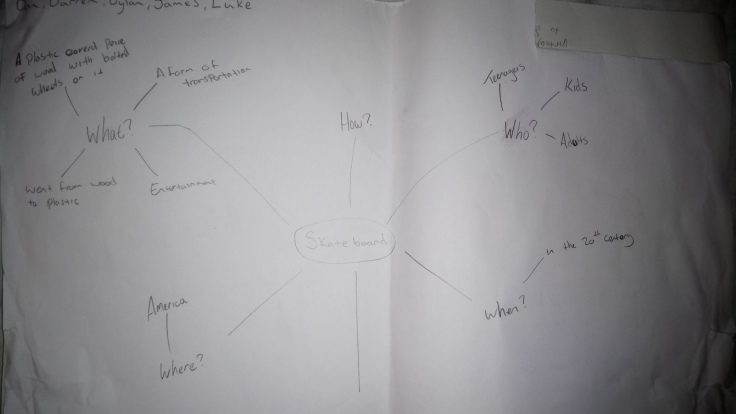
Within this session I was asked to write about what I know about the well known object ‘the skateboard’ creating a spider diagram consisting of 6 questions: What, Who, When, Where, Why and How. After this we are going to be watching a documentary as well ad going and doing extensive research on skateboards to expand our knowledge about the skate board. The reason why I am doing this task is because it is based on a subject that isn’t related to my specialist study and it is something that I am not too firmilar with which makes it a good task to do.
For the first part of the session we was given the task to gather in groups and write down what we knew between us about skateboards to see what we really knew about them and it turns out that my team and I didn’t know that much about the skateboard as we initially though we did.
We knew very little about the skateboard and about its origins and choice of style, look and make that they were based around and why they were designed like this which is why we watched the documentary about the history of skateboarding to see how the skateboard came to be and how it has changed overall as time has passed.
Throughout the documentary I gathered a few notes that I though were rather helpful and that they were a good incite of how the skate board has changed as well as how they are used from then up until now. Some of the information that I found out was that the skateboard was really closely related around the sport surfing, the way that the original boards were shaped and designed rather close to that of a surf board as well the colours that were used on the boards themselves.
This also lead into how they were used, it explained this by showing the story and progression of the ‘Z-dogs’ that were a surfing group that later evolved into skateboarding because of the free time that they had after surfing. They implemented the way that a famous surfer surfed by being rather close to the waves spinning and swooping around on the spot and this soon because a trend and rocketed the skateboarding legacy that it is today.
After we found out more about skateboards as a whole we set off to find out more information that the documentary didn’t give us and this is what we found:
We found out that there has been an addition to the wheels and the under part of the board by making it easier to make the board turn as well as making new wheels that add less friction which is what the clay wheels did.
Trucks for the wheels
http://www.skateboardingmagazine.com/top-5-innovations-in-skateboarding-history/
We also discovered that they have added different types grip that was added to the top of the board as well at the bottom of the shoes people wear when riding skateboards.
Grip for board
Skateboarding.transworld.net/news/the-evolution-of-griptape/
Advanced searching method
After we watched the documentary and gathered the information off of it we further dove into more research about skateboards about the information that we didn’t quite get from the documentary and we wanted to know more or we didn’t find something out and we’re just curios to what it could be.
gathering this research was a difficult task to do because of the amount of results that cropped up within the search engine and the amount of websites that didn’t relate to the information that we wanted to find out. So, to make it easier to gather the correct information I used something call the Boleen method of searching that takes out most of the unwanted web pages that clog up the results that are given to you.
The way that this kind method is used you need to search up the topic that you need and add extra words like: NOT, AND, +, – to give you different results and to make my searches more direct to the specific information that I want.

Second spider diagram
After we did this research and watched the documentary we created another spider diagram to see what we had learnt from doing this research and we made a big improvement for what knowledge that we learnt within this task about skateboards.

Evaluation
Throughout this task I managed to go from not knowing a lot about skateboards to knowing a lot about them to finding out a huge amount of about them, this is going to help me when researching for my FMP because it is going to be similar in the processed that I do and how I will execute what I would like to find out. Maybe next time I could get each individual member of my group to research a certain question that we would like to find out and we could gather more information this way.
Throughout this task I found out a lot about skateboards, a topic that wasn’t even related to my specialist study which has helped me with my research skills and the advanced search technique that we used (boleen technique) helped find out information more related to what we wanted to find out about the wanted subject that we wanted to find out about.
Old skateboard
Unit 2 specialist study (Week 3)
Introduction
This session I am going to be looking into the specialist study that I am hoping to progress into later on in the future as well as for my FMP later on this year. I will be creating two spider diagrams one before and one after I have done extensive research into my chosen subject much like the previous task that I have under took.
My chosen specialty is environmental design, I created a spider diagram on environments within games on the knowledge that I have on them already and what I think makes a good environment I worked on categorising different aspects of environments within games things such as lighting, point of views, different uses of the environments and the different moods (horror, comedy, adventure, etc).

Environmental design
Mario of 1985 was one of the first game that added backgrounds to the levels and to also have a foreground where there was an interactive (In the later games) and they move along with the music unlike the background that is static and doesn’t move along with the screen this was the trend throughout a lot of the earlier games such as: Super Mario Bros 1-3 and super Mario world.
This changed when it hit 1996 when Super Mario 64 came out and added a whole new perspective on the 3D environment that was around you and the character, by giving you a 360 degrees view of the world making it a whole different experience for the players adding lots of different aspects to their surrounding world. Super Mario Galaxy have added more high qualitied animations and environments to the world giving more movements and interactions than ever before.
Now going back to the 2D based games they brought out new Super Mario bros Wii and new Super Mario Bros U, these games added both backgrounds and foregrounds to the environment and they added moving and interactive foreground objects to move as well as the background slightly changing.
Going back to 1980 there was another game that had a similar environment to what Super Mario 64 has and this game was Battlezone (1980) and this game done this by having very primitive and simple shapes the objects that are within the environment and having them get bigger/smaller and giving the visual effect that they change as the player model goes around them.
The people who created Battlezone in 1980 was Atari by Ed Rotberg, Owen Rubin (exploding volcano), Roger Hector (tank & enemy graphics). The audience in the 1980s was mainly around kids of the ages of 13-16 because of the arcade stores as well as having not so many to process within these games.
A game that helped pave a way for more realistic environmental exploration as well as graphics was Wolfenstein 3D by adding a whole new perspective to the environment of a game by adding a huge range of colours and perspective on a 3D environment much like Battle zone In 1980. The reason why these type of changes have happened is because of the advances that have happened within the storage and the technological side of games has increased throughout the years, in turn making the environments of games better and more complex.

The environment of a game has changed so much throughout the years way back to the early 1980’s all the way to modern day and they are still improving. They’re becoming more diverse and innovative in the way that they’re created, laid out, textured and even given to the audience.
In the early development of games in the 1970’s there was only limited things that game creators could do with their games relating to the games background. At first it started off as just a plane black background that the game was played upon and then it started to developed further in 1980 a game company going by the name Atari created a game called Battlezone that had a basic development of an environment.
And shortly after this Wolfinsteine 3D opened up a whole different experience with the environment within games by giving you a completely roam-able area in which the surrounding move around you according to what directing you are facing it will change the environment to go that way. WOlfinsteine 3D was revolutionary to the gaming world by its unique approach on the environments of the worlds within games. This was also shown within the game DOOM because it had a really similar layout and design.
Environments have still changed throughout the years getting gradually better in graphics. Introducing open world environments where the whole world is explorable to the players, this opened up a whole new look upon the environments within the gaming world.
There has been many different ways within games that they have explored and shown off their environments. In some games they have simple colour and shaped to represent objects within their world and in other games they have very intracute designs for their objects making it more real world based. As well as this they have introduced many different ways that the environment is displayed (i.e. top down, landscape, open world, etc).
One of the most up to date and innovative environments that have been within a game/ within a form of game play is VR environments they have introduces a completely different view on the environments within games by giving the player a virtual reality headset you can go within to the environment yourself making the game more “realistic” than it would be if you was to play on a computer. VR has changed games and their environments forever because of the realistic graphics that they have within some of their games. As well they’ve made it so the headset is tracked so as you move your head the in game view will change as if you’re within the game itself.
Free roaming worlds
Free roaming games allow you to explore a potentially endless full of so many possibilities that can be done in any order that the player chooses to do. Some of these games are games like GTA, Skyrim, Fallout and Runescape all of these games have a free roaming world that is filling with endless possibilities that could happen at any given time giving the player countless amount of hours of game play.
Games like this have to have a lot of props to fill up all of the space in which the games come with and this means a lot of ever changing environments within the games. A lot of work has to go within these games to make them exciting the more you explore their worlds, rather then just having a world that has the same design and build in a lot of places which can make the game repetitive and boring.
The environments for these games have to be well though out to both portray meaning and story with every part of the surroundings which makes these games environments one of the best within the gaming industry. Countless amount of props have to be put within the environment to tailor for their surrounding and events in that area entails.
A game that really wanted to push the boundaries on this is “NO mans sky” in the fact that it wanted to have a forever spawning galaxy that added millions of planets that all have different environment from each other making them all unique to one another. However this was not the case because as found out that most of the planets were just duplicates of other with just different lighting textures of the surrounding life and of the planets texture.
So this shows that they were only just experimenting with this kind of this of making a forever spawning and forever different universe and it didn’t go as planned because of this very reason.
Talk about other games that use open world features like GTA, SKyrim, etc.
Evaluation
Within this task I have found out a lot about my specialist that I would like to go into and how it has changed throughout the years of game development. This is going to help me with an understanding on what would work best within an environment as well as what goes well with on another and within my FMP it will help me create the perfect environment by using the information that I found out. As well as this it will give me a better understanding of what is good within environments as well as what is contrasting against one another.
Mario history
http://www.makeuseof.com/tag/origins-history-mario-geek-history-lessons/
https://www.pokecommunity.com/showthread.php?t=322236
Battlezone history
Steps to planning level design
Human emotions ‘Fear’ (week 4)
Introuduction
Within this session I am going to be looking at how convey fear within my chosen discipline within games and how other artists/developers have done this through their work and how I can adapt and bring this into my work in the future of my projects. Later on I’m going to create a 3D model that shows off the research that I have done.
The over all reason why I am testing out new ways, techniques and methods that I can use to create something that relates to fear is so that I can both develop my skills within modeling and world design as well as having more of an understanding the work that is put within different mediums to invoke fear.
The question that I am hoping to answer by the end of this session is how to create a horror environment well enough to invoke fear to the players? And how I can use this within my own work.
Research
I am going to be looking at many different artists and how their work interporates fear within what they have done and how they have developed this through their projects. As well as this I am going to be looking at games and how they use their props, textures and layouts to portray fear to the audience.

The first thing that I looked at was a game and that game is Dead space 3 and the reason why I have chosen this game is because of the colours and genre that it is. Throughout the game you are met with lots of gruesome scenes that are covered with blood, rust and decay, which helps with the aesthetics of the game by making the scene scary.
Throughout the game you are met with a lot eerie scenes that use sound as well as visuals to give the player a sense of fear as it happens. The video below shows examples where they have used sounds within some of the scenes to invoke fear to the players by using high pitched noises as well as deep and dark tones that adds a sense of intensity to the moment that can give a feel of panic to the players within this scene.
Dead space scary scenes
Other games that I looked at were resident evil and Layers of fear. Resident evil 7 midnight uses light to its advance a lot within the opening scene by only lighting up a very small amount of the surrounding area making the game really difficult to look around and navigate the surrounding area. As well as this they use a great deal of decals’ on the objects that are strategically placed around the environment (which makes it hard to move around when the enemy attacks you) to give off a story to the player that is exploring, sometimes adding more and more questions to why they are here and for what purpose.
The Woman in black
A movie that shows the type of fear ha I was trying the evoke into my audience and the inspiration for my idea for the rocking chair to be placed at the end of a creep and old looking hallway. The whole theme of this task was based around this movie and how they evoked the fear onto the viewer at this given time and it is why I decided to incorporate a hallway into the project that I was doing.
As you can see throughout this video clip the rocking stars off quiet and it gradually gets louder and louder as the character get to the door. This kind of idea of the player looking away or moving backwards was going to be an extra feature to add a fearful encounter.
Creating fear
I have decided for my task I was going to first create a 3D model of a rocking chair to be placed at the end of a hall that I believe is going to add suspense to the player making them feel uneasy as they approach the rooms ahead, going towards the rocking chair within the dark room ahead.
To start the process of making the rocking chair as well as the environment I looked into some movies as well as real rocking chairs and how they differ frim one another, what makes them stand out and what is it that makes them evoke fear on people.
I looked at the well known ‘The woman in black’ at the scene where the rocking chair is within the child’s room and it begging to rock frantically and the sound that it produces as it is rocking back and forth veraciously smacking the ground with a loud thud. This gave me the idea to put my rucking chair at the end of hallway making it rock back and forward smacking the floor getting progressively faster and faster as you walk towards the room.


So to start off this chair I decided to get the overall shape of it by creating basic rectangles that were positioned at the correct positions to make the shape of the chair. I made sure that all individual pieces of the chair were colour co-ordinated so I cold easily create one of the models and simply copy it over.

After getting the shapes in the correct position on the model I decided to make all but one of the shapes transparent (by pressing CTRL+X) so i could work on the individual parts with out the others getting in the way too much when I rotate around the chosen part.
To get the shape of the part where you sit I added a champfer to the edges to give it a shaven look to it as well as adding extra lines in the middle so I cold adjust then to make the object warp inwards (as shown above).
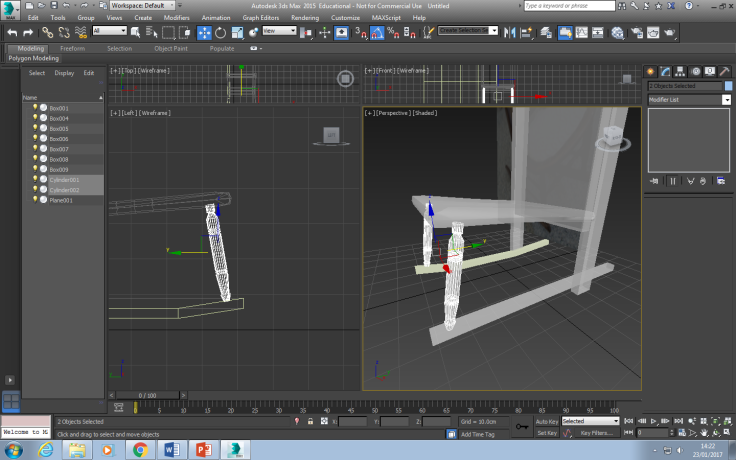
I started to work on the rocking chairs legs. I used a different method, instead of shaping the rectangle that I already had I decided to use the line tool and the ‘Lathe’ to give it a curved look to it, this however didn’t work and it made the object deform and not match up correctly. After not being able to make it this way I decided to create a cylinder and shape it that was instead.
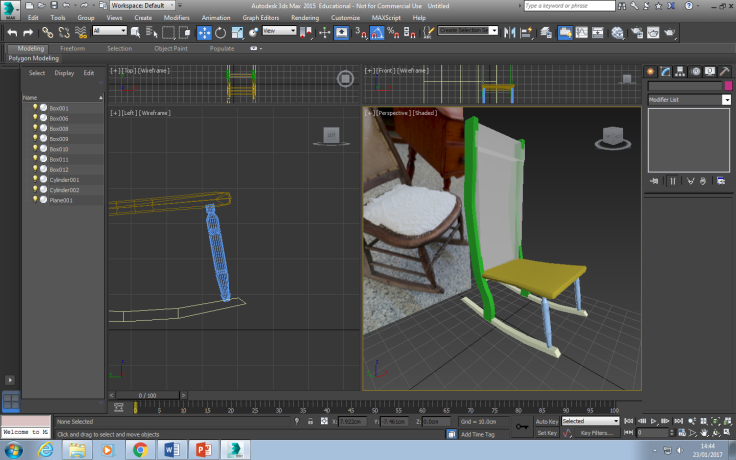
After sorting out the front legs I sorted out the back legs making them curved at the bottom as well as the top to give it more of a classical arched back look.

One I was happy with the other all shape of the parts of the rocking chair I decided to add different smoothing groups to make it seem more like wood and have less jagged areas around the chair. Also, it was to help with the wooden texture that I was going to be adding after this.
So I looked through the different textures on Textures.com to find one that I thought would be the best looking wood for the rocking chairs design that I wanted to create. I ended up finding a rather good looking texture that I thought could work well the my over all design (Above – the lighter one). However, this texture was far too light so I added a light modifier over the top of the textures layer that made it darker and to the colour that I wanted it to be.

Applying the textures was a pretty simple task, so there wasn’t much of an issue when overlaying these maps to the object. I didn’t change the texture over the whole chair because at first I thought that I would leave it plane at first so I could have a brief look at the whole chair fully textured and I will edit it later.
After all the texturing, I noticed that the head board at the back of the rocking chair didn’t suit the main of the rocking chair as I wanted it to. So I decided to shape it to look like an 1900’s style chairs head rest.

To give ff the sense of fear I looked a different textures that I cold use for both the back cushion and the seat cushion. I wanted to find something that looked really creep and scary. Finding the right texture was a bit of a challenge, this is because I wanted to find a texture that fits a certain story rather then some random blood splatter, also making sure it isn’t random but has meaning.
The two textures that I got, I think suit the same purpose that I originally wanted them to and they both seem to go with the same sort of story -making sure that they didn’t look as if they came from two different murders – having them have the same kind of consistency and similarities.
There was a little issue when adding the texture to the model because I created the unwrap backwards it made it difficult to line up with the model because of this reason, to make the texture go the way that I wanted them to I had to flip the image in Photoshop to align it properly.
This is what the finished textures look like when I applied them to the 3D model this made the image come to life within a sense, giving the chair a story and meaning to what the theme was as well as what I was planing on doing with the model.
To finish the whole scene off I created a hallway with a room at the end of it that was going to house the rocking chair within it. The overall idea of this was to have the chair in the room and the player was at the other end of the hallway and as the player progresses towards the door the rocking chair rocks and gets faster and louder the closer you get.
Evaluation
Throughout this task I have discovered more about creating fear within game and on how much details have to go in within creating a good environment as well as creating a good mood and textured environment. Applying all of the information that I found out about the feeling fear I was able to make, texture and create a horror environment to a good standard. Many of the skills that I used while doing this task have improved by the end product, especially the unwrapping and texturing. The skills that I demonstrated within this task are going to help me out in the future with other projects that I wish to do.
My unwrapping skills have improved significantly and I have more of an understanding on how to unwrap as well as texturing the models that I create which is going to help me when unwrapping other models for my FMP.
Going through these processes to gather the information about a certain subject and develop and create something form that has helped me a lot in understanding how I can use this kind of method within my own projects . As well as Helping me develop my skills within 3D more and within texturing to a certain type of genera.
Unfortunately the whole task wasn’t able to be completed to what I wanted it to be due to technical problems that didn’t allow us to add the animations that we needed. For next time we are planning on speeding up to modeling process to make enough time to create the animations.
Rocking chair
http://i-restorestuff.com/an-old-rocking-chair-renewed-hemp-oil-burlap/Page Break
Dead space concept art
https://www.pinterest.com/pin/418271884115603379/
Resident evil 7 midnight
http://www.theverge.com/2016/6/14/11930748/resident-evil-7-e3-hands-on-demo
Human emotions ‘Memories’ (week 4)
Introduction
Within this session I am going to be looking at how to portray Sadness/ family and memory within video games and how they give the sense of feeling of sadness and give the player a sense that a certain item has more meaning to it then the eye sees of the players. I am going to be researching games that use a similar method of making game objects give off a memory of sadness or happiness through these objects.
Later on I’m going to create a 3D model that shows off the research that I have done giving of a sense of memory that comes from the object I am going to choose to create.
Research
I am going to be looking at the different types of ways that games give items a sense of great meaning to the main character by either giving them a sense of happiness or sadness or making them have a vision/ flashback to the memory or to think of the thing that relates to that object.
I looked at the game Unravel, the reason why I looked at this game is because throughout the game you are following a sentient being of yarn what goes through the old ladies house, going to each picture that initiates a memory that is related to the old ladies life when she was growing up until this point.
All of the pictures start a memory that you have to play through and throughout the image/memory it shows you a part of the story and the life of both the old lady when she was younger and about the place that she grew up, it shows you what happened to her and why it is such a memorable point in her life. As you progress throughout the story you gather pins that – with everyone you find – adds more photos to the old ladies photo album showing you the happy memories that each of the pictures/levels are based around.
This concept and idea I though was a very good implementation to the game making the player understand and see the journey that the old lady and the ones who are dear to her went through within each of the memories.
Psychological science
I looked into the Psychology behind memories and how a memory is created and on what terms that they are created. If something the happens to you is traumatic it generally become fixed within your head, which as time goes by this memory will play on the mind of whom ever experienced this moment and it will continue to play repeatedly in the ‘mind’s eye’ which will cause the occupant distress.
Within the game Fallout 4 you play as either “Nate” or “Nora” and they are subjected to such an experience when they see their wife/husband be killed by a mysterious assailant who then proceeds to steal their child (Sean) from their partners’ lifeless arms. This plays a huge part in the characters mid set when he/she is suddenly woke for his ‘cryogenic sleep’ and through the story he/she is focused on one thing that is to find the man the killed their husband/wife and to find their missing son.
It goes on to explain that everyone undergoes some form of traumatic experience within their life and it will affect them in a different way to one another due to the level of the traumatic experience and on the person it is done to. For most war veterans they might suffer from PTSD (post-traumatic stress disorder) where as others might suffer from an emotional disorder ACE (adverse childhood experiences) or depression that is caused from their experiences.
As well as this I was thinking of having something that is more of a fear that gets brought up by looking at the object. Something that is known as Uncanny valley where the mind is subjected to having a fear and unsettling feel of emotions when they’re involved with something like this and an example of something like this is AOT (Attack on titan). This game has enemies that have proportions that are rather disproportionate to the rest of the body giving some players a sense on un easiness. Another game that does this is Alien Isolation and the AI that are within this game.
Creation
I am thinking about creating an object that will make a character remember a certain thing – in this case it’s the characters son/daughter – that relates to the object that they either look at or hold. This is going to take some time to think about what I would like the object would be and how I can relate it to a memory that is about someone, something or somewhere that is important to the character.
The idea that I had was to create something that is related to my FMP because it is based after the Second World War and I was thinking of making it something that one of the main characters hold dear to them. In the case of my FMP idea I was thinking of making a toy that was one of the main characters son/daughters favourite toy and this could like within to the memory being activated because she/he is taken away from him by his crazy brother who has gone insane due to the experiences that he endured within the war.
I’ve looked at many different toys and dolls that they had in the 1940s to give myself a better understanding on their shapes as well as how they are made and textured, this is going to help me out a lot when making this object. The first toy that caught my eye and made me think about having the child as a boy was to make a wooden plane that was the child’s favourite toy to have that reminded him of his father.

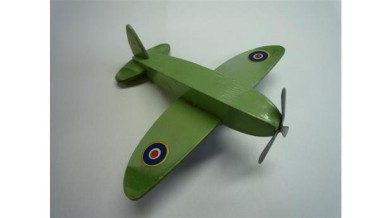
I found many planes that were made around the 1940s which is where my FMP is based around each of which have a different aspects to each of them making them unique in the way that they are shaped and the way that they are designed overall.
The wooden one looks rather basic and plain to the look yet it looked home made and very early design on the other planes that I found. The metal plane has a rather sharp look to it as well this one looked as If it was made within a factory. I looked at may other planes that were made around the same time as these and I looked at the similarities, differences and what makes them stand out from one another and the reason why I was looking at things like this is because I wanted an object the could really convey the sense of memories.
I have decided to go for the wooden plane and the reason why I have chosen this over all of the other planes is because I think that it can give off a better meaning of a memory as well as love. It looks like it has been made by someone which gave me the Idea to have it made by the main characters children for their father as a gift which is why it means so much to the main character and why it has so much sentimental value.
Creation process

Base shapes
For the start of my creation of the plane I decided to start off with the overall shape of the plane by mapping out the lengths of the wings, the middle of the plane and the back rudders of the plane. I did this so I could roughly calculate the over all shape of the toy plane without messing it up. I used the simple design of making only just rectangles to make up all of the plane, I did this because it was going to be easier to shape most of the plane as I go through rather then trying to make the shapes straight away.
Shaving off edges
I worked on making the wings of the plane more rounded by first champfering the edge closest to the front of the plane because that part isn’t as curved as the back half of the propellers. After I sorted out the angle that I wanted the planes win to be I curved the back edge to make the lines join up and create an arch to complete the shape of the wings.
Refining shapes
After the wings were the desired shape that I wanted to make them I started to shape the main body of the plane I made the front pointed so it resembles that of the other plane and I made the end thinner to make it more aerodynamic like the one in the picture i was using as reference.

Adding textures
After this I was working on shaping the back ends of the plane just like I didn’t for the front of the planes wings I did the same shaping formation with the last three parts of the plane.
When I completed making the shapes of the plane to what I wanted them to look like I decided to UVW map them and add textures and decals to the planes wings any its body to give it a wood feeling to it just like the original images shows.I have decided to gather different textures one of which is a burnt wood another that is off of a normal plank of wood and the other that is a piece that has pealed a little, I’ve overlaid these three to give the effect that it has been burnt in a certain place of the plane.
This is the maximum amount that I managed to produce within the time that I had to create it.


Make the connections between the practitioners and also the work you have made and try to analyse the themes and why you think they were a success, what went well? What didn’t? Show more examples of other industry professionals who have used this.
The processes and experiments you have shown are lovely, you have explored and broken these down thoroughly. Be more reflective though. On your doll task, I feel you have made more progress on the task in class, this should also be written up. What do the shapes mean on the doll? They are rounded? Continue to analyse the themes and the progress of your work and how you have adapted your own skills in conjunction to other developers.
Second experimentation
My second Its that I thought could be a trigger to a memory of some sort that is similar to the first item that I created which is this paratrooper doll that the main character gave to his daughter because he is a paratrooper in the war she hold it dear to her because of this reason.

Shaping the model
I started by making most of his body out of cylinders because I thought it would making it easier for me to give the stitched and stuffed look of the fabric that is within the other picture at the original picture. I created the arms, kegs and the head to be separate assets to the body so it could be easier for me to texture as well as create the model.

Shaping stitches
After the shape was made I decided to inset one end as well as adding a champfer to it so it looks as if it was bundled together at the seames. I did also ad an extrude to make it seem as there was a bit that hanged over as an overlay of the fabrics

Smoothing and refining the edges
Once this was complete with both of the arms I did the same for the legs, by using the same method as I did with his arms. This gave the exact same effect that I had with his arms.

Adding tiny details
After making the arms ad the legs to the correct sizes as well as the correct overall shape that I wanted them to be I decided to add the hands and feet to complete the overall aesthetics of the dolls body. I created these with thinner cylinders that I simple added more faces to add a curve and an extrusion on the hands to add a little thumb.
Adding a hood
The final part for me to move on to was the head and I knew jest how to make this to the correct size without making another circle from scratch. I copied the original circle and made it bigger so it was a snug fitting around the dolls head and after the fitting was right I added a shell to make the plane thicker.
Straps
I added little straps that are under the head because the original image had these at more of an angle so I was thinking of having them placed to get instead of making them flap away freely.

Adding textures
Adding the textured details I chose a fabric that was similar to what was in the original image, however I chose a burlap type fabric that gave it kind of a hard look to it unlike the original soft looking fabric. To add later FX to the fabric later like decals, grooves or even differences in tone I unwrapped each individual piece of the model to make sure I could do this in the future.
Evaluation
I am rather happy with what I produced both in how it look and the textures that accompany the work produced. The overall shape of the plane I think is rather good compared to the original, however I do think that there could be some improvements to help solidify the fact that it is made of wood rather then plastic or another material.
The burnt texture I think went rather well and I think it could use a little more work on it to make it look as if the surrounding area around the burn is peeling away as well as having singe marks across other parts of the wood to make it more authentic to look at. As well as this the addition or worn arks across the joints of the plane and around the propeller could add a lot more meaning to the plane because it would show more of an understanding of the work that his child put into making this plane as well as how much they play with the propellers.
For the paratrooper I think that he/she turned out rather well considering the difficulties with the unwrapping and texturing of the model because of the design and shape of most of its body. However, this is going to help me when creating future models that involve a lot of work and creativity to with the intricate curves and difficult texture unwraps.
Unravel memory
Psychology behind memories
http://journals.sagepub.com/doi/full/10.1177/0956797615583071
Uncanny valley
http://www.strangerdimensions.com/2013/11/25/10-creepy-examples-uncanny-valley/
Alien isolation
http://g33kingout.com/alien-isolation-review/
AOT
Burnt plane
https://www.etsy.com/listing/87706932/vintage-toy-airplane-1940s-wyandotte
Wooden plane
http://www.bbc.co.uk/ahistoryoftheworld/objects/4fnZWmsWQduACszg2fh8YQ
Metal plane
Experimentation (Week 5)
Introduction
Within this sessions I am going to be using different techniques and processes to create different types of work all for the same purpose and the reason why I am doing this is to expand my knowledge on the other types of medium and techniques on my chosen specialty. I am going to be demonstrating and looking at different techniques that are going to help me with my FMP. The reason for us to do these type of experiments is so that we can discover new ways to create pieces of work of our own chose specialist study expanding on what we already know and taking that to the next level of production.
All of this is going to help me with my FMP because it is going to help me improve on my skills that I am going to be using for my FMP as well as my experimentation with other types of mediums are going to help me with creating some of my work within.
Experiment #1
The first experiment that I undertook wasn’t anything to do with 3D modeling in the sense of creating the models, because I decided to create a drawing of an environment of which I wanted to be within my FMP. The reason why I did this is because I wanted to try mapping out a level on paper and use different ways in doing so I will make it easier when creating my FMP level and layout.

As you can see from this image above I have mapped out a very basic layout of one of the environments that I am thinking about creating for my FMP. I have mapped out where I would like the objects to be placed (after I create them) and what I want the objects to be.
Making this top down image of what I would like the room to look like after I finish creating it its going to help me when creating the dimensions of the room as well as the exact spacing of the assets within it.
Experiment #2
The second experiment that I was like the first experiment where it isn’t related to 3D modeling per-say because this time I decided to create different strokes with a pen to create different strokes to create different types of effects.

The reason why I experimented like this – using different strokes and different styles in making these strokes – is because I was looking at the different ways that I could use the same colour and the many ways that I can create different shades and colours with it.
This is going to help me when creating and editing textures that I am going to use for my models that I create. By testing out the different techniques and styles of creating patterns I an use these as both reference and as textures (mainly decals) if I need/want to.
Experiment #3
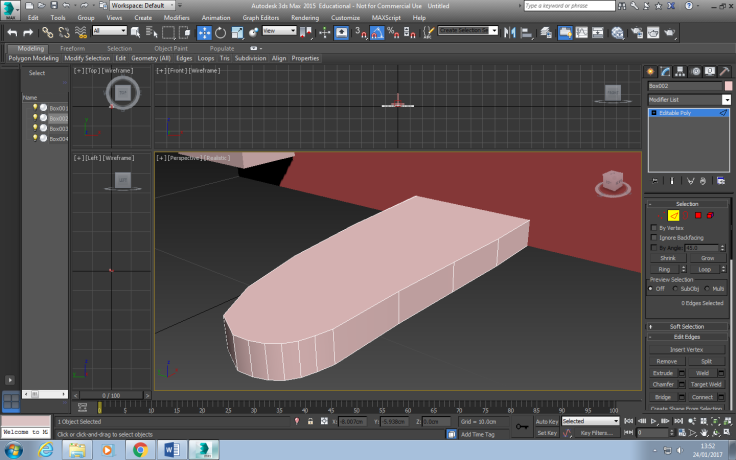
For my third experiment I decided to get a little more hands on with my approach and go a little further with my /first experiment where I created a top down design of a room that I was going to be creating for my FMP. In this case I decided to create an environment that was different from the one that I chose before, but this time I was going to create the environment with cardboard creating the models that I would end up creating in 3DS max.
The environment that I was going to be creating was the
I started to create the main structure of building using a cardboard box that was roughly the shape and dimensions that I wanted them to be so that it can have the right portions as the building would have. I then used a pair of scissors to cut away the first layer of the cardboard to make it seem like the indents on the actually building to make the model more aesthetic rather then drawing a design on the cardboard.

Doing this as well as cutting the wholes within the cardboard was a little time consuming and difficult especially when it came to making the window hole that is above the door because this was already weak, taking off the layer of cardboard covering made it significantly weaker. This did however split the box breaking it which is why I had to tape it together to make sure that it lined up correctly.
After I had cut all of the holes and engravings that were needed – as shown within the original image- I decided to add a cardboard flap as well, for the balcony. Making this was unsupported because of the size of the balcony so I added supports that were under the balcony in order to support the weight of it and the railing.
A member of my FMP design team helped by creating a little British flag that took us a little time to think of how to create it because our first idea of having multiple coloured paper and sticking them together didn’t work too well. Because our initial idea of creating the flag didn’t work we though about having one singular white piece of paper and just colour over it with red and blue pens to complete the design.
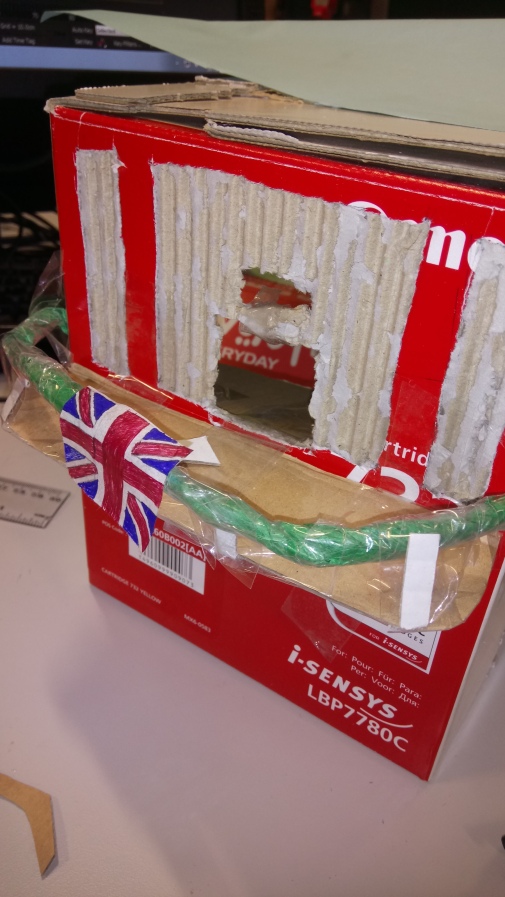
After making and completing the overall design to add aesthetics I decided to make a little cut out of Winston Churchill himself to make the whole set complete, as well as making it seem more relevant to the image as well as scale.

After it was complete I did notice a little issues to do with scale because of the little figure that I created was too big as well as the railing which could mess up with the building process within 3DS MAX.
Experiment 4#
For my fourth experiment I am going to be looking at the different ways to create and use textures within Photoshop and using them on my 3D models. I am going to be using my model from the previous task so that I can adapt and modify the doll to have different markings on it.
Practitioners report (Week 6)
Introduction
For this task I am doing to be looking at practitioners that relate to my specialist stud, which in my case it is environment design of games. I am going to be looking at the formal elements that make these games and how these have evolved throughout the years, as well as this I am going to be looking at how they are designed and what the ae designed from.
I’m going to base my research around the 1970-80 where the first development of games really started to become more enhanced and developed than the early design of games. Making sure that my work stays up to date as well I am going to look at work that’s from the present day to see how this has changed.
ID software
I am going to be looking first at games that are made around the early age of games to get an understanding on how they were created, what their inspirations were, the processes that were taken to make these games as well as looking at the history of their work that either lead to this point that the game was created or has lead them further to create other games closer to the present day.
The games that I have chosen to look at is Doom and Wolfenstein 3D, these games are rather similar in design and the way that they are make because they were both created by id Software. Wolfenstein 3D was created in 1992 and it became the first, first person shooter and it changed the way the environments of games were looked and create.
The industry was founded on February 1st, 1991 (Texas) by programmers John Carmack and John Romero, game designer Tom Hall, and artist Adrian Carmack. This group of people were members of the company “Softdisk” who gathered together to create games such as Wolfenstein 3D, Doom, Quake and Commander Keen.
Formal Elements
For the game Doom the colours that were used were rather dark and basic because of the time that the game was created there wasn’t a very big pallet that could have been used within games due to the time that this game was created. The overall reason why they only used these colours is because it set the mood of fear, the colour red normally signifies danger or something that isn’t good and greys/blacks are more of dull.
The greys also add an industrial feel to the surroundings making the areas seem more cold then lively and warm. I looked into the colours and found out more about their meaning to help further both my research as well as my understanding on the colours that they used. The colour red symbolizes energy, war, danger, strength, power and blood, all of which are related to something bad in one way or another.
Another mod the colour red can be associated with is that it excites emotions that make us take action in certain situations that aren’t going for the better. This does, however make sense within the Doom game because as the player takes damage the screen becomes redder as you take more damage, which makes the player become hasty to get out of the situation.
The colour grey isn’t one of those colours that show much of an exciting it is rather plain and dull compared to the other colours that it has to “compete” with. However it is more focused towards the darker shade of grey which brings in more of a mysterious look as well as making the colours closer within the light spectrum. The website says that the colour grey is subdued, quiet and reserved. It does not stimulate, energize, and rejuvenate.
These colours were a common trend for the future Doom game that was released in 2016 sing mostly dark colours and keeping with the over use of having deep dark reds within every nook and cranny of the game. This kind of trend has been kept throughout all of the games by having a similar type of colour scheme and textual design.
Lighting was another big prat within this game that added to the overall feel of horror and intensity that Doom gave off as you played it. This kind of trend has kept throughout both of the Doom games, both the old and the new one, where there isn’t much lighting in both hell and on Mars and the only lighting that there is either fire or light reflection.
Narrative
The overall pace of the Doom games have been similar by putting the character within a very immediate situation where they have to fight for their lives or an onslaught of enemies that attempt to kill you. The overall pace of the games are really quick, fast paced that don’t really have a moment of rest within the game, giving the players very little time to collect themselves before that have to fight another huge wave of enemies.
They have also designed the “Glory kills” of the enemies to be rather fast too
The characters movement speed is at a quick pace to hat is accompanied with the guns that he uses to keep up with the fast action that both the character undergoes as well as the guns speed (rate) of fire. There are so many different combinations of player b using the weapons that are provided that it will “Tailor your experience to your certain playstyle” – Hugo Martin.
Within the game they also have items that give off semiology to the players. This is shown through the colours that the objects are given, for example: the shields within the game are a strong green colour which indicates that it is good because of its purpose and what it does. Another example of this is through the power ups that you can obtain within certain areas, they are all given a different colour and the all have a different meaning to them.
These orbs al have the colours that best suit their ability that it gives you, the red orb gives you berserk which gives you the ability to kill all the enemies instantly without getting damaged from them, The Purple Gives you a lot of power – which is one of the meanings of its colour- as well as glom because of its dark shades.
Inspiration
After John Romero and is team created Wolfenstein in 1991 they then moved on to create a game called Doom in 1993. Their inspiration for such a world famous game was the board game “Dungeons and dragons” and this made them have an idea of the Doom universe John Romero says: – “John Carmack, lead programmer, was Dungeon Master as usual. I got greedy trying to procure a magic sword and caused the entire world to be overrun by demons”. This initiated the idea for the game we know as Doom, as well as Dungeons and dragons, the film Aliens 2 was a huge inspiration for the development for Doom.
They changed the theme about aliens and finding them, just like in the move, but they were in hell which correlates with the demons that came out of hell within Dungeons and dragons.
Materials
To create Doom they had a few materials that they used in order to create it one of which was modeling clay that helped them model the characters and what they was going to look and possibly move/animate like. As well as clay they used a toy dinosaur for one of their characters ‘Pinky’ to model his overall shape and movements.
They had to create a whole new engine just for the new Doom game. To do this their programmer Carmack had to spend hours on just making the engine, in return it made the game run smoother, faster and easier with more assets within the game than any other game that they had created before.
Scanning in the characters and creating them wasn’t too difficult to do because of the similarities in Doom and its predecessor Wolfenstein 3D.
Hidetaka Miyazaki
Hidetaka miyazaki is the creator of the games blood born as well as darkeners both of which involve a lot of gore and torment with every step of the way. He first was the director of the game called Armored core it in 2000. In 2010 he started the Dark siders series and in 2015 he created Blood born within all of these games they have all of a similar trend of how dark and sinister that they all look.
Formal elements – Within Hidetaka miyazakis games there is a repetition of having lots of gore and decay that is on every possible surface within the games that he has created and it is a trend that he keeps. The elements of using mainly blacks and dark colours (grays and browns), which shows much relevance to the old game ‘DOOM’ by having very strong colours that are within the same colour spectrum and then having colours (mostly browns) the define the different areas.
Both of these games show a trend with having a viskis mass spewed across most of the games levels indicating something is bad. Within DOOM it shows the gore, blood and suffering of the hellish nature and within Blood born it has black mass that is a sign of evil.
The lighting is of the game is rather dark and dusty which adds to the scary backstory as well as the tones and textures of the surrounding architecture of the levels and characters. all of these elements adds to the gruel and unwelcoming feel of the games.
This style of lighting and colouration has been a trend within Hidetaka miyazakis work.
Narrative – Throughout the levels there tends to be indications that there is something about to happen which is a sign of semiology and it does this by giving the character an introduction (Within blood born) where the surrounding area begins to change and wither, filling with the black mass more and more as you get closer to the main point of danger. As well as this it presents that player with a huge opening that gets you ready that there is going to be a Boss battle ahead.
Bibliography
Doom image – N/A. (1999-2017) MobyGames. Available at: http://www.mobygames.com/game/doom (Accessed: 20/02/2017).
Doom wiki – Surname, Initial. (10 February 2016/29 October 2016) id Software
. Available at: https://doomwiki.org/wiki/Id_Software (Accessed: date).
Inspiration of Doom – Hoad, P. (Monday 27 January 2014/ N/A) How we made the Doom game. Available at: https://www.theguardian.com/artanddesign/2014/jan/27/how-we-made-video-game-doom (Accessed: 21/02/2017).
Wolfenstein 3D –
Colous – Parker, R. (N/A) The meaning of Colors. Available at: https://resources.oncourse.iu.edu/access/content/user/rreagan/Filemanager_Public_Files/meaningofcolors.htm (Accessed: 20/02/2017).
Colour wheel – http://www.color-wheel-pro.com/color-meaning.html
http://uk.ign.com/companies/id-software
Hidetaka miyazakis story –

February 13, 2017 at 1:38 pm
Good start here Dylan, ensure that you spell check and properly forma your blog neatly. read the comments below to improve and work on this in half term please. Email me for any help and guidance.
Week 1 and 2
Mind Map – What I love, why I love it, What I know about it
Good mind map an explanation about your passions and personal interests. This will help you creatively to realise your own skills and passions.
Interviews x 2 – with your analysis of the process and the content.
Audio files are not inserted. What kinds of questions did you ask your partner and why?
Myers Briggs – your link to your results. Also, for the tests that other people did of you.
Really strong post here Dylan, I feel that you understood the nature of what was being asked of you and why. You have made relevant analysis and evaluated well.
Your analysis of your results –
Personal Primary Research Report- Not on blog- ensure that you have written up the weeks 1-2 work explaining what you have found out from the activities.
Week 3
Mind Map on what you know about Skateboards-
Your skateboard mind map is good; you have explained the limited knowledge that you have on the subject and the relevance of the task. Well done.
Your research – with Screen Grabs – You need to insert the screengrabs that you do have on here. You have explained the purpose of this well.
Your Group Mind Map with your analysis of research methods undertaken-
You have completed this mind map well and shown that you understand the processes and why they are important when conducting research. Well done. Just keep checking for spelling and grammar.
Your Skills Research Report – mind map, screen shots and sourced research, with analysis of the process and research sourced-
You have begun a good report on your own interests and have been looking closely at . I think that you can go into more detail with this task. How has it influenced your life? Look at the industry also and look at the defining moments of environmental design. I admit, it is a broad subject, but you have only touched upon it at the moment. Have a look at more recent games such as Skyrim, GTA and Red dead redemption- amazing environment designs, which are scarily realistic. How has this changed? You have not looked at the technology and how it has changed- create a timeline and focus on the change in style and how consoles have got bigger to process them also.
Your Feedback and Reflection of the tasks undertaken
Continue this
Weeks 4 and 5
Task 1
Using the theme of FEAR, experiment with materials, techniques and processes (media) making sure you:
A strong start to your blog here Dylan, you have shown that you understand the importance of research in regards to your own practice. You must explain why you are experimenting and how the processes that you have used are developing your own skills. Ensure that you are spell checking and referencing thoroughly. Your formatting in the blog also needs to be improved. I feel that your evaluation is a little limited, go back and reflect further in the skills you have developed and what you will do with them.
Task 2
Choose your own theme, genre, or idea
You have chosen a good theme for your experimentation; this is highlighted for work you have produced. Make the connections between the practitioners and also the work you have made and try to analyse the themes and why you think they were a success, what went well? What didn’t? Show more examples of other industry professionals who have used this. The processes and experiments you have shown are lovely, you have explored and broken these down thoroughly. Be more reflective though. On your doll task, I feel you have made more progress on the task in class, this should also be written up. What do the shapes mean on the doll? They are rounded? Continue to analyse the themes and the progress of your work and how you have adapted your own skills in conjunction to other developers.
LikeLike
February 13, 2017 at 4:08 pm
Hello Cat I have done some improvements to the post already and I shall be continuing on doing so throughout the day. I just wanted to inform you that I have a little trouble with screen shots, as my word doesn’t allow me to take/save screen shots that I have taken which is why some of my works screen shots are missing and I apologies for this impracticality. I will try my best to resolve this issue at hand.
LikeLike
February 25, 2017 at 11:14 pm
The Boolean technique is well explained and you have a clear understanding of it and how to research with it. Well done.
Good research on the environment design, you have understood the concepts of this and how practices have advanced through time. You could show a few more examples of this visually though.
You have listened and read the feedback given, well done!
LikeLike
February 26, 2017 at 2:16 pm
Thank you Cat I will add some pictures for more evidence and research 🙂
LikeLiked by 1 person